Over a period of time, the lens of the projector accumulates dust and creates a murky cloud of images. It affects the viewing by reducing the brightness and sharpness of the content displayed. Cleaning the lens after aa period of time makes it possible for you to have a clean lens and bright images. It’s not all about cleaning the lens but doing it safely.
Cleaning the lens prevents you from spending more money in the future for repairs. Cleaning is not as hard as you have imagined, as long as you follow instructions given. Before you begin cleaning, you must first get all the items needed for cleaning to make it easier for you. This is what you’ll need for cleaning.
Editors Guide: How To Clean A Projector Inside Lens?
- Microfiber cloth
- Compressed air
- Lens cleaning solution
- Tissue
Step1: Turn off The Projector

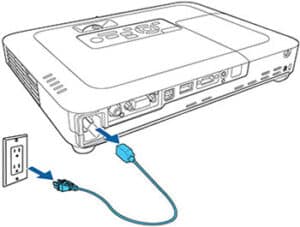
When you start to clean the projector, you must first turn it off and unplug from power and the wall. If the projector is still warm or hot, give it time to cool before you start. We know that when the projector runs for a whole three or four hours, it can get really hot. It’s more brittle when it’s still hot cooling is the right option for safety. When the lens is cool, it’s safe to clean since it’s unlikely to break easily. The first step is not hard at all.
You have to do it as instructed on cooling, or else the lens will break to pieces when still hot. When the projector’s lens is all cool, then its time to open the projector. Remember that all of the projector models are different, and it would be better to look at the given manual. The manual helps you to understand the way you can open the projector safely. There’s a latch or button on the projector housing in most projectors that make it easier to open up.
Step 2: Clean With Air Compressor
The next thing to do is clean the projector inside with the air compressor. Using the short burst of the compressor, hold the can roughly 4 inches from the projector. Target the dust you see on the projector and move the nozzle around it to puff it off. Continue for a while, paying attention to the fan to remove accumulated dust. You should also pay more attention to the projector’s housing and remove the dust inside the projector altogether. It’s impossible to get rid of all the dust in the projector but remove as much as possible. It’s not just removing the dust. Make sure you are not blowing the dust back into the projector. Wipe the visible dirt with the microfiber cloth first. Then you may use ay moisture while in the cleaning process to get all the dirt away. Microfiber cloth is the best in removing dust on the lens and cleans it well.
Step 3: Use A Moisture Cloth To Remove Traces of Dust
With a well-moistured cloth, you can remove any last traces of the dust from the case of the projector and leaves it clean. The cleaner the case and lens, the more comfortable you are watching on the screen. When the dirt has clouded the lens, the images tend to have clouds, and brightness is affected by it. Clean the projector’s housing after you have cleaned the inside to avoid it, sticking to the lens. It’s also to avoid it being dirtier than it was.
Step 4: Remove The Lens Cap
Now, this is the main step in the projector lens cleaning. Now that you have cleaned the inside of the projector and everything, it’s the final lens touch. Remove the lens cap, drop lens cleaner on a tissue, and wipe it clean in a circular motion. The circular motion is to help clean it without leaving it dirtier. The lens cleaner is specially designed for cleaning the lens and dries quickly too. When you are done cleaning the lens, replace the cap, and have it right in place.
You May Also Like To Read:
- How Do I Connect My Sound System To My Projectors Perfectly?
- Best Budget Projector: https://projectorslab.com/best-budget-projector/
- Prime Day Projector Deals 2020: https://projectorslab.com/prime-day-projector-deals/
- Thanksgiving Projector Deals 2020: https://projectorslab.com/thanksgiving-projector-deals/
Myself Ruby Vivian, I am a BIGGER-screen enthusiast and I can’t lie. Served as an electric technician for 7 years now, and I loveee what I do. You can learn more about me here.