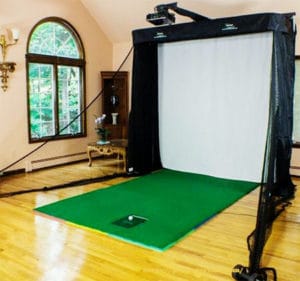
A golf simulator is a great indoor technological device made to provide simulated golf experience right in your home. Simulated golfing has been designed for those that have hardly any time to go for actual real golfing but still get it home.
The device gives you great simulated experience, which pertains to the real world golfing course and weather patterns to provide you with the real feeling and experience of being on the field.
For one to experience the best of the simulated golf, you will need it. With the right golf simulated projector, you get to enjoy the best of virtual simulated golfing anywhere you want.
Let’s Begin The Main Step
With the virtual simulated device on your hand, you will need to get all the necessary materials and equipment to set up a golf field before you start projecting. For the best of the home golf simulator experience, you will need to get a good screen first, which an essential foundation of the game. Get all the material required to start the installation and look at the specs it has greatly.
Get a hitting enclosure to help maintain your ball in place and stop hitting all over. Unless you are a pro on hitting the ball but you still probably don’t trust yourself to hit on the target all the time. Therefore you will need the hitting enclosure to safeguard the mis-hits.
In order to get the big image display on the screen for a fantastic display, get the right projector for it. When looking for a perfect projector, make sure you get the image size you need and the on that it seems perfect for your space and the screen size.
For your mounting configuration, you have to match the aspect ratio of the projector to the screen you are using well. The accessories are sold separately before the installation of the projector. You should get them ready. After installing the screen and then hitting the enclosure of the golf simulated surface ready, get the projector and place it in the middle. Install a ramp system at the bottom of the projector and place it down.
Use the thumbscrew to secure the ramp system well to the projector before you continue. Ensure your projector is centered on the projector screen; otherwise, you are going to experience image distortion. After getting your projector at the center of the screen, measure the distance of the projector from the screen. The length between the screen and the projector varies from one project to another.
Therefore you will have to make sure the images you are displaying on the screen fit well according to your project. Install the surge protector behind the projector ad connect the power cord to it. Install one end of the power cord to the projector while other to the surge protector. Power your projector well, and then you can start hitting the golf ball. Before that, you can have an artificial green carpet installed for a perfect hitting on the real-life experience of the golf simulator.
Conclusions
Witch golf simulator at home for you to use, you don’t have to worry about not going to the field for practice. You can become a pro right from your home with everything being so real, even the weather pattern. You get to decide where you install the golf simulator, including the garage if it has enough space. There are so many golf simulators in the market, and you will only need to get the right one that works well with the projector you have at home.
You May Also Lie To Read:
- The Best Projector 2021 Reviews With Buying Guide
- Top 10 Best Projector Mount 2020 With Buying Guide
- What Is The Best Ultra Short Throw Projectors For 2021?
Myself Ruby Vivian, I am a BIGGER-screen enthusiast and I can’t lie. Served as an electric technician for 7 years now, and I loveee what I do. You can learn more about me here.